Thursday, 12 January 2012

Installing Red Hat Enterprise linux 5 step by step

                   For installing Red hat Linux Enterprise Edition 5, Do the following Steps
Step 1: Turn on the system and insert the First CD, then you will get the following Screen.


Step 2:  From the above Screen, For installing in Graphical Mode Press Enter.  Here i am installing in graphical mode. After Pressing the Enter key you will get the next screen.


Step 3: After Searching the Device drivers and all other things it will display the Media Check Prompt.
If you want to check whether the your Media is working Properly or Not. If you don't want to check the media Click on Skip or else Ok.


Step 4: After the Media Check you will get the following Screen.

     
Step 5: In the above screen Click the Next, Then you will get the Installation Language Scree will appear.
Select the appropriate Language and Click the Next.


Step 6: Now you will get the Keyboard language, Select the required Keyboard language and click the Next.


Step 7: After clicking the Next you will get the License Key Prompt. If you have the License key enter the key in the below field. If you don't have the license click on Skip.

Step 8: Now it will give a waring Are you sure want to Skip the License? Again click on the Skip button, then you will get the Hard Disk partitions Screen.


Step 9:  In the above screen, it will shows the default settings. i.e It will remove all partitions in system and Creates the default file systems. So now i am going with default Settings only. If you want to make Customize File systems select the Customize File systems from the drop down menu and click on Next.
Here you will the following screen.


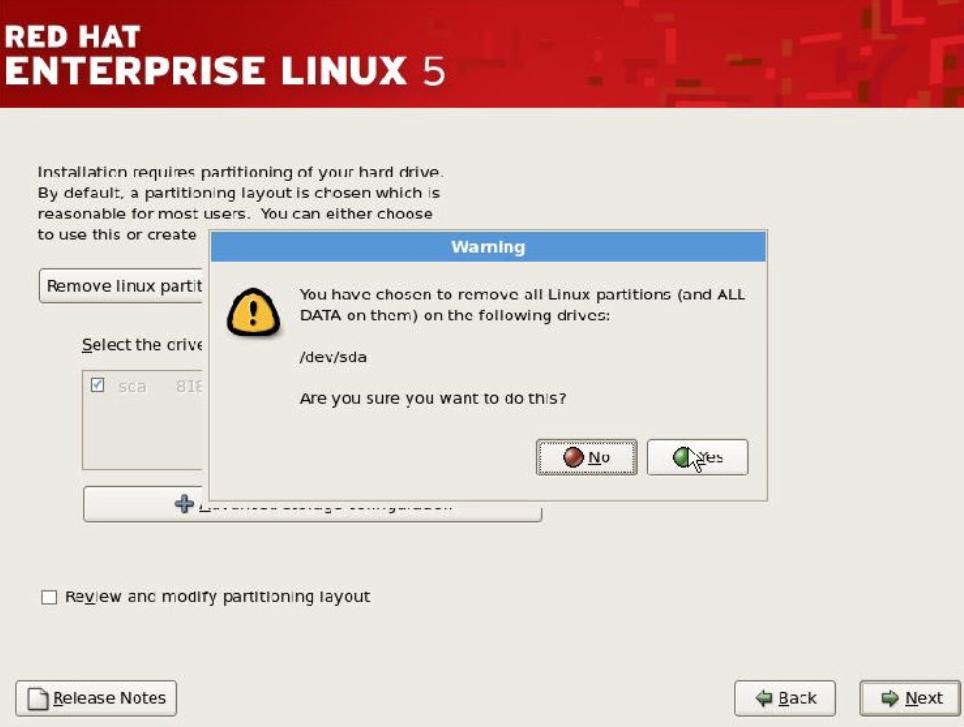
Step 10: In the above Screen it will gives a warning message that You have chosen to remove all the partitions. Are you sure you want to do this? Click on yes and you will get the Network Screen.


Step 11: In the above window i am going with default DHCP. I will configure my network later. So click on Next, then you will get the time zone window.


Step 12: Select the appropriate time zone and Click on Next, then you will get the root Password screen.


Step 13: Enter the root Password and Conform the Password again and click on Next. Now you will get the Package Installer window.


Step 14: From the above window if you want to customize the Packages select the Customize now or else select  Customize later and Click on Next.
                                                 You will get the following windows.
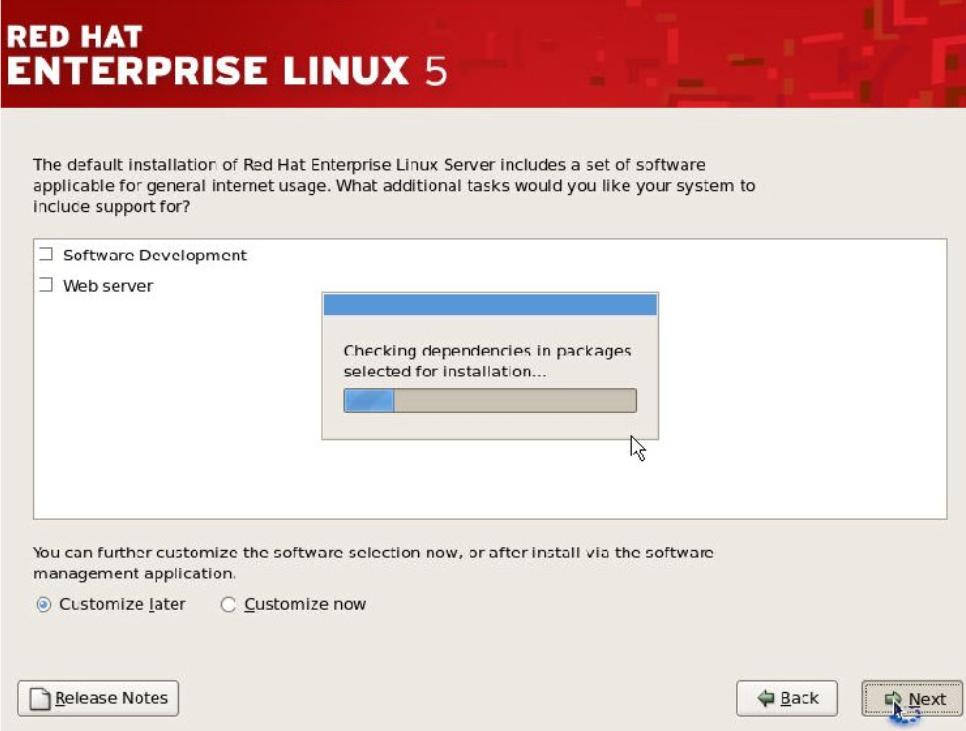


Step 15: In the above Screen if click on Next the Installation will Begins or else if you want to change anything click on Back.


Step 16:  In the above window It will warn you that Keep the 3 CD's or else Click on Reboot.  So i am going click on Continue to continue the installation. Now you will get the following Screens.


 Step 17: In the above Screen it asking for Insert CD 2. So insert the 2nd CD and Click on OK. It will automatically continue the installation.


Step 18: After installation it will display the following Prompt. i.e Again asking the CD 3. So insert CD 3 and click on OK. 


Step 19: After Completing the complete installation. It will display the following screen. 


Step 20: In the above screen it shows the remove the media from the CD-Rom and click on Reboot.


Step 21: After the Restarting the system it will display following Screen.

Step 22: In the above screen click on Forward then you will get the License Agreement window. In that accept the License agreement and Click on Forward then you will get following Screen.


Step 23: Keep the firewall enabled and give the exceptions which service you want and click on Forward. Now you will get Date and Time settings. Select the Date and Time, click the Forward.


Step 24: Now you will get the setup for software Updater. Select i prefer to register later and Click on Forward. 


Step 25: Now you got the User creation window. So enter the following fields and click on forward.


Step 26: After the user creation you will get the following Screen about sound card in your system and click on forward.


Step 27: After the above screen you will get the final window. i.e Finish wizard. In this wizard if you want install any Packages insert the CD's and install the packages Or else click Finish.


Step 28: Now you are in Login Prompt. So enter the appropriate user you have created or else login by using root user.


 So finally you have successfully installed the Red Hat Linux Enterprise Edition 5.


Enjoy the Linux with High Security and Reliability........

Thursday, 3 November 2011

Configuration of FTP Server in LINUX

Ftp server is designed for uploading and downloading the files, when ftp server users log's in, they get their home folder at client side and if public/anonymous user log's in they get data stored in /var/ftp folder

Steps to Configure FTP Server in LINUX

Step:--1.  Check and install required Packages

Check the packages are installed or not by rpm/yum command

[root@server ~]# rpm -q vsftpd

Remove the packages and old data if required

[root@server ~]# yum remove vsftpd* -y

Install the Packages

Note: Here my file is at Desktop. So i was changing the path to Desktop.

[root@server ~]# cd /root/Desktop/
[root@server Desktop]# ls

FileZilla3  tomcat  vsftpd-2.0.5-10.el5.i386.rpm

[root@server Desktop]# chmod 777 vsftpd-2.0.5-10.el5.i386.rpm

[root@server Desktop]# rpm -ivh vsftpd-2.0.5-10.el5.i386.rpm
warning: vsftpd-2.0.5-10.el5.i386.rpm: Header V3 DSA signature: NOKEY, key ID 37017186
Preparing...                ########################################### [100%]
   1:vsftpd                 ########################################### [100%]

Step:--2. Create the resources on ftp server (file/folder & Users)

   Create users and assign passwords to whom you want to allow logging through ftp
  
   [root@server ~]# useradd tom
   [root@server ~]# useradd joy
   [root@server ~]# passwd tom
   Changing password for user tom.
   New UNIX password:
   BAD PASSWORD: it is too simplistic/systematic
   Retype new UNIX password:
   passwd: all authentication tokens updated successfully.
   [root@server ~]# passwd joy
   Changing password for user joy.
   New UNIX password:
   BAD PASSWORD: it is too simplistic/systematic
   Retype new UNIX password:
   passwd: all authentication tokens updated successfully.
   [root@server ~]#

Create or Copy some files inside /var/ftp/pub folder

[root@server ~]# cd /var/ftp/pub/
[root@server pub]# touch fa.txt fb.txt music.mp3
[root@server pub]# ls
fa.txt  fb.txt  music.mp3


Create a Upload folder for anonymous users and give full permission for read/write.

For example LINUX N UNIX HELP UPLOADS

[root@server pub]# mkdir /var/ftp/linux n unix help uploads
[root@server pub]# chmod 777 /var/ftp/linux n unix help uploads
[root@server pub]#


Step:--3. Edit the Main Configuration file /etc/vsftpd/vsftpd.conf

[root@server ~]# vi /etc/vsftpd/vsftpd.conf

  12 anonymous_enable=YES
 
  15 local_enable=YES

  27 anon_upload_enable=YES

  83 ftpd_banner=Welcome to LINUX N UNIX HELP

 
  :wq!
 
 
Step:--  4. To block the ftp server users (for Ex:-- joy) write the user name in file
 
  /etc/vsftpd/ftpusers
 
  [root@server ~]# vi /etc/vsftpd/ftpusers


# Users that are not allowed to login via ftp
root
bin
daemon
adm
lp
sync
shutdown
halt
mail
news
uucp
operator
games
nobody
joy
~
~
~
~
~
~
~
:wq!


Step:--5. start th ftp service


[root@server ~]# vi /etc/vsftpd/ftpusers
[root@server ~]# service vsftpd restart
Shutting down vsftpd:                                      [FAILED]
Starting vsftpd for vsftpd:                                [  OK  ]
[root@server ~]# service vsftpd restart
Shutting down vsftpd:                                      [  OK  ]
Starting vsftpd for vsftpd:                                [  OK  ]
[root@server ~]#


Note:--- Your system Firewall should be turnoff or In firewall settings ftp exception should be added.

For Checking your ftp in Client Machine, Do the following steps:

1.Open the Web Browser and give following URL

ftp://192.168.10.121/

Here replace your ftp server IP address.

To upload or Any changes use any Ftp Software like Winscp or Filzilla , etc....


Wednesday, 2 November 2011

Network Configurations in Linux

Assigning a static IP address --- temporarily

Syntax:--

[root@server ~]# ifconfig <devicename> <IP address>

Example:-- To Assign the static IP address as 192.168.10.121

[root@server ~]# ifconfig eth0 192.168.10.121

To check the IP assigned

[root@server ~]# ifconfig
eth0      Link encap:Ethernet  HWaddr 00:08:02:F7:33:6A
          inet addr:192.168.10.121  Bcast:192.168.10.255  Mask:255.255.255.0
          inet6 addr: fe80::208:2ff:fef7:336a/64 Scope:Link
          UP BROADCAST RUNNING MULTICAST  MTU:1500  Metric:1
          RX packets:773 errors:0 dropped:0 overruns:0 frame:0
          TX packets:137 errors:0 dropped:0 overruns:0 carrier:0
          collisions:0 txqueuelen:1000
          RX bytes:77098 (75.2 KiB)  TX bytes:23592 (23.0 KiB)
          Interrupt:177

lo        Link encap:Local Loopback
          inet addr:127.0.0.1  Mask:255.0.0.0
          inet6 addr: ::1/128 Scope:Host
          UP LOOPBACK RUNNING  MTU:16436  Metric:1
          RX packets:1670 errors:0 dropped:0 overruns:0 frame:0
          TX packets:1670 errors:0 dropped:0 overruns:0 carrier:0
          collisions:0 txqueuelen:0
          RX bytes:3349244 (3.1 MiB)  TX bytes:3349244 (3.1 MiB)

Set Permanent IP address

Do the following Steps:

1. Go to the following Path

    [root@server ~]# cd /etc/sysconfig/network-scripts/

2. After that edit the following file

   [root@server network-scripts]# vi ifcfg-eth0
  
# Broadcom Corporation NetXtreme BCM5702X Gigabit Ethernet
DEVICE=eth0
HWADDR=00:08:02:f7:33:6a
ONBOOT=yes
NETMASK=255.255.255.0
IPADDR=192.168.10.121
GATEWAY=192.168.10.254
TYPE=Ethernet
~
~
:wq!

3. After this restart the network service to activate the new IP address.

To see the LAN card i.e NIC card Parameters


[root@server ~]# ethtool eth0
Settings for eth0:
        Supported ports: [ MII ]
        Supported link modes:   10baseT/Half 10baseT/Full
                                100baseT/Half 100baseT/Full
                                1000baseT/Half 1000baseT/Full
        Supports auto-negotiation: Yes
        Advertised link modes:  10baseT/Half 10baseT/Full
                                100baseT/Half 100baseT/Full
                                1000baseT/Half 1000baseT/Full
        Advertised auto-negotiation: Yes
        Speed: 100Mb/s
        Duplex: Full
        Port: Twisted Pair
        PHYAD: 1
        Transceiver: internal
        Auto-negotiation: on
        Supports Wake-on: g
        Wake-on: d
        Current message level: 0x000000ff (255)
        Link detected: yes

To enable IP address

[root@server ~]# ifup eth0

To disable IP address

[root@server ~]# ifdown eth0


This is a file where IP address are stored.

[root@server ~]# cd /etc/sysconfig/network-scripts/
[root@server network-scripts]# cat ifcfg-eth0
# Broadcom Corporation NetXtreme BCM5702X Gigabit Ethernet
DEVICE=eth0
HWADDR=00:08:02:f7:33:6a
ONBOOT=yes
NETMASK=255.255.255.0
IPADDR=192.168.10.121
GATEWAY=192.168.10.254
TYPE=Ethernet

Tuesday, 1 November 2011

Networking in LINUX

Introduction to Networking in Linux

To check the system hostname

[root@localhost ~]# hostname
localhost.localdomain

Assigning the hostname - temporarly

Syntax:-

[root@localhost ~]# hostname <computer>

EX:- To assign the hostname as server.linuxnunixhelp.com

[root@localhost ~]# hostname server.linuxnunixhelp.com

To check the hostname assigned

[root@localhost ~]# hostname
server.linuxnunixhelp.com

Assigning hostname ---- Permanently

Edit the configuration file /etc/sysconfig/network

NETWORKING=yes
HOSTNAME=server.linuxnunixhelp.com


:wq!

System Process Commands in Linux

TO check the Process id of any application, command etc

[root@localhost ~]# ps -aux

To kill a process normally


[root@localhost ~]# kill <process_id>

ex: -- [root@localhost ~]# kill 2521

To kill the process forcefully use stamp value as '9'
[root@localhost ~]# kill -9 <process_id>

[root@localhost ~]# kill -9 2521

To see the cpu & process status
[root@localhost ~]# top

To see the open port number and service name

[root@localhost ~]# netstat -antp
Active Internet connections (servers and established)
Proto Recv-Q Send-Q Local Address               Foreign Address             State       PID/Program name
tcp        0      0 127.0.0.1:2208              0.0.0.0:*                   LISTEN      1802/hpiod
tcp        0      0 0.0.0.0:969                 0.0.0.0:*                   LISTEN      1635/rpc.statd
tcp        0      0 0.0.0.0:111                 0.0.0.0:*                   LISTEN      1606/portmap
tcp        0      0 127.0.0.1:631               0.0.0.0:*                   LISTEN      1819/cupsd
tcp        0      0 127.0.0.1:25                0.0.0.0:*                   LISTEN      1854/sendmail: acce
tcp        0      0 127.0.0.1:2207              0.0.0.0:*                   LISTEN      1807/python
tcp        0      0 :::22                       :::*                        LISTEN      1833/sshd
tcp        0    148 ::ffff:192.168.10.120:22    ::ffff:192.168.10.114:1401  ESTABLISHED 2411/1


To view how long the system is running

[root@localhost ~]# uptime
 23:34:45 up 23 min,  2 users,  load average: 0.00, 0.02, 0.08

To view Process, Resource and File Systems

[root@localhost ~]# gnome-system-monitor &


To dump the traffic on the network

[root@localhost ~]# tcpdump -i eth0


To display or change Ethernet card settings
[root@localhost ~]# ethtool eth0
Settings for eth0:
        Supported ports: [ MII ]
        Supported link modes:   10baseT/Half 10baseT/Full
                                100baseT/Half 100baseT/Full
                                1000baseT/Half 1000baseT/Full
        Supports auto-negotiation: Yes
        Advertised link modes:  10baseT/Half 10baseT/Full
                                100baseT/Half 100baseT/Full
                                1000baseT/Half 1000baseT/Full
        Advertised auto-negotiation: Yes
        Speed: 100Mb/s
        Duplex: Full
        Port: Twisted Pair
        PHYAD: 1

To Recover Root Password in Linux

1. Restart the PC while restarting press any key to get Grub Screen
2. Press 'e'
3. Select kernal /vmlinuz-2.6.18.-8.el5 ro root=LABEL=/ rhgb quiet
4. Again Press 'e' to edit
5. Edit kernal /vmlinuz-2.6.18.-8.el5 ro root=/ rhgb quiet line and erase quite and type single
6. Press enter
7. Press b to boot
8. At shell prompt type the commands

sh-3.00# passwd
Changing Password for user root
New UNIX Password:123456
Retype new UNIX Password: 123456
Passwd: all authentication tokens updated Successfully.

Now type the following command to Restart the system to the normal Login

sh-3.00# init 6

Usage of chkconfig command

To view the status of the the services in all runlevels
 

[root@localhost ~]# chkconfig --list

To view the status of the Particular services.
For example Bluetooth


[root@localhost ~]# chkconfig --list bluetooth
bluetooth       0:off   1:off   2:off   3:off   4:off   5:off   6:off

To put the service at all runlevel as on

[root@localhost ~]# chkconfig bluetooth on

To view the status

[root@localhost ~]# chkconfig --list bluetooth
bluetooth       0:off   1:off   2:on    3:on    4:on    5:on    6:off

To put the service at all runlevel as off


[root@localhost ~]# chkconfig bluetooth off

To view the status

[root@localhost ~]# chkconfig --list bluetooth
bluetooth       0:off   1:off   2:off   3:off   4:off   5:off   6:off


To manually stop the service

[root@localhost ~]# service bluetooth stop
Stopping Bluetooth services:                               [  OK  ]

To Manually start the service

[root@localhost ~]# service bluetooth start
Starting Bluetooth services:                               [  OK  ]


To Manually restart the service

[root@localhost ~]# service bluetooth restart
Stopping Bluetooth services:                               [  OK  ]
Starting Bluetooth services:                               [  OK  ]


Monday, 31 October 2011

Boot Process in Linux

To View the default runlevel while booting the Linux Operating System
[root@tsmservertest ~]# vi /etc/inittab

id:5:initdefault:  (End of the line in Fedora OS)

Note: It means that OS by default always boot to GUI mode.


To View the current runlevel

[root@tsmservertest ~]# runlevel
N 5


To Switch to another runlevel and check the runlevl
[root@tsmservertest ~]# init 3
[root@tsmservertest ~]# runlevel
5 3

[root@tsmservertest ~]# init 2
[root@tsmservertest ~]# runlevel
3 2


[root@tsmservertest ~]# init 1
[root@tsmservertest ~]# runlevel
1 S


[root@tsmservertest ~]# init 6


To View the grup configuration file


[root@localhost ~]# cat /boot/grub/grub.conf

Saturday, 22 October 2011

Backup and Recovery

Create a folder
for EX:-- /myfolder

[root@tsmservertest ~]# mkdir /myfolder
[root@tsmservertest ~]# cd /myfolder/

Now create Some files and folders inside it.

[root@tsmservertest myfolder]# mkdir dir1
[root@tsmservertest myfolder]# touch 1 songs tom_file
[root@tsmservertest myfolder]# ls
1  dir1  songs  tom_file


Use the tar command to tape archive the folder

[root@tsmservertest ~]# tar -cvf /opt/myfolder.tar /myfolder
tar: Removing leading `/' from member names
/myfolder/
/myfolder/tom_file
/myfolder/dir1/
/myfolder/songs
/myfolder/1

[root@tsmservertest ~]# cd /opt/
[root@tsmservertest opt]# ls -l
total 12
-rw-r--r-- 1 root root 10240 Oct 22 13:01 myfolder.tar


To Create a tar file with zip

[root@tsmservertest opt]# cd
[root@tsmservertest ~]# tar -cvzf /opt/myfolder.tar.gz /myfolder/
#########OUTPUT#############
tar: Removing leading `/' from member names
/myfolder/
/myfolder/tom_file
/myfolder/dir1/
/myfolder/songs
/myfolder/1
[root@tsmservertest ~]# cd /opt/
[root@tsmservertest opt]# ls -l
total 16
-rw-r--r-- 1 root root 10240 Oct 22 13:01 myfolder.tar
-rw-r--r-- 1 root root   194 Oct 22 13:10 myfolder.tar.gz


To View the contents of the tar file without extracting

[root@tsmservertest opt]# tar -tvzf /opt/myfolder.tar.gz
drwxr-xr-x root/root         0 2011-10-22 12:58 myfolder/
-rw-r--r-- root/root         0 2011-10-22 12:58 myfolder/tom_file
drwxr-xr-x root/root         0 2011-10-22 12:58 myfolder/dir1/
-rw-r--r-- root/root         0 2011-10-22 12:58 myfolder/songs
-rw-r--r-- root/root         0 2011-10-22 12:58 myfolder/1

To remove the folder

[root@tsmservertest ~]# rm -r /myfolder/
rm: descend into directory `/myfolder'? y
rm: remove regular empty file `/myfolder/tom_file'? y
rm: remove directory `/myfolder/dir1'? y
rm: remove regular empty file `/myfolder/songs'? y
rm: remove regular empty file `/myfolder/1'? y
rm: remove directory `/myfolder'? y
[root@tsmservertest ~]# cd /


To extract the tar file or recovery the data


[root@tsmservertest /]# tar -xvzf /opt/myfolder.tar.gz
myfolder/
myfolder/tom_file
myfolder/dir1/
myfolder/songs
myfolder/1


After extracting see the contents inside the folder


[root@tsmservertest /]# ls /myfolder/
1  dir1  songs  tom_file


Friday, 9 September 2011

Disk Quotas in Linux

1. Create 4 users as below

          a. Ravi with the default properties
          b. Sunil whose primary group is sales
          c. Tom whose primary group is sales
          d. Rani whose secondary group is sales
2. Create a partition and mount it with users and group quotas enabled.
3. Apply quotas to the user Ravi and the group sales and check.

Create a Group

Example:- To create a group called as sales

 [root@test119 ~]# groupadd sales

Create the Users

Example:- Create users and add some to sales group

[root@test119 ~]# useradd ravi
[root@test119 ~]# useradd -g sales sunil
[root@test119 ~]# useradd -g sales tom
[root@test119 ~]# useradd -G sales tom
[root@test119 ~]# useradd -G sales rani


Create Partition using fdisk

Command:-

[root@test119 ~]# fdisk /dev/sda

Command (m for help): m
Command action
   a   toggle a bootable flag
   b   edit bsd disklabel
   c   toggle the dos compatibility flag
   d   delete a partition
   l   list known partition types
   m   print this menu
   n   add a new partition
   o   create a new empty DOS partition table
   p   print the partition table
   q   quit without saving changes
   s   create a new empty Sun disklabel
   t   change a partition's system id
   u   change display/entry units
   v   verify the partition table
   w   write table to disk and exit
   x   extra functionality (experts only)
Command (m for help): p

Disk /dev/sda: 40.0 GB, 40016019456 bytes
255 heads, 63 sectors/track, 4865 cylinders, total 78156288 sectors
Units = sectors of 1 * 512 = 512 bytes
Sector size (logical/physical): 512 bytes / 512 bytes
I/O size (minimum/optimal): 512 bytes / 512 bytes
Disk identifier: 0xae04ae04

   Device Boot      Start         End      Blocks   Id  System
/dev/sda1   *        2048     4196351     2097152   83  Linux
/dev/sda2         4196352    20678655     8241152   83  Linux
/dev/sda3        20678656    31016959     5169152   83  Linux
/dev/sda4        31016960    78155775    23569408    5  Extended
/dev/sda5        31021056    41357311     5168128   83  Linux
/dev/sda6        41359360    47798271     3219456   82  Linux swap / Solaris
/dev/sda7        47800320    54042623     3121152   83  Linux
/dev/sda8        54044672    58238975     2097152   83  Linux

Command (m for help): n
First sector (31019008-78155775, default 31019008): +100M
Value out of range.
First sector (31019008-78155775, default 31019008):
Using default value 31019008
Last sector, +sectors or +size{K,M,G} (31019008-31021055, default 31021055):
Using default value 31021055
 
Check if the new  Partition has been created

[root@test119 ~]# fdisk /dev/sda

Command (m for help): p

Disk /dev/sda: 40.0 GB, 40016019456 bytes
255 heads, 63 sectors/track, 4865 cylinders, total 78156288 sectors
Units = sectors of 1 * 512 = 512 bytes
Sector size (logical/physical): 512 bytes / 512 bytes
I/O size (minimum/optimal): 512 bytes / 512 bytes
Disk identifier: 0xae04ae04

   Device Boot      Start         End      Blocks   Id  System
/dev/sda1   *        2048     4196351     2097152   83  Linux
/dev/sda2         4196352    20678655     8241152   83  Linux
/dev/sda3        20678656    31016959     5169152   83  Linux
/dev/sda4        31016960    78155775    23569408    5  Extended
/dev/sda5        31021056    41357311     5168128   83  Linux
/dev/sda6        41359360    47798271     3219456   82  Linux swap / Solaris
/dev/sda7        47800320    54042623     3121152   83  Linux
/dev/sda8        54044672    58238975     2097152   83  Linux
/dev/sda9        31019008    31021055        1024   83  Linux

Partition table entries are not in disk order

Note:- Here i dont have free space in My Hard Disk. So i was took default space.

Saving the Partitions

Command (m for help): w
The partition table has been altered!

Calling ioctl() to re-read partition table.

WARNING: Re-reading the partition table failed with error 16: Device or resource                                              busy.
The kernel still uses the old table. The new table will be used at
the next reboot or after you run partprobe(8) or kpartx(8)

To update the kernal without restarting the system

Command:

[root@test119 ~]# partprobe /dev/sda


Format the Partition in Linux

[root@test119 ~]# mkfs.ext3 /dev/sda9

Mounting the Partition with user and group quotas enabled

Syntax:

mount <option> <arguments> <partition name> <mount poin dir>

Example:- To Mount the 9th Partition on a directory /mntpoint with user and group quotas enabled

[root@test119 ~]# mkdir /mntpoint
[root@test119 ~]# mount -o usrquota,grpquota /dev/sda9 /mntpoint/

To view mounted partitions

command:-

[root@test119 ~]# mount
/dev/sda8 on / type ext4 (rw)
proc on /proc type proc (rw)
sysfs on /sys type sysfs (rw)
devpts on /dev/pts type devpts (rw,gid=5,mode=620)
tmpfs on /dev/shm type tmpfs (rw,rootcontext="system_u:object_r:tmpfs_t:s0")
/dev/sda1 on /boot type ext4 (rw)
/dev/sda3 on /home type ext4 (rw)
/dev/sda5 on /opt type ext4 (rw)
/dev/sda2 on /usr type ext4 (rw)
/dev/sda7 on /var type ext4 (rw)
none on /proc/sys/fs/binfmt_misc type binfmt_misc (rw)
sunrpc on /var/lib/nfs/rpc_pipefs type rpc_pipefs (rw)
/dev/sda9 on /mntpoint type ext2 (rw,usrquota,grpquota)


Apply full permissions on the mount point


Example:-


[root@test119 ~]# chmod 777 /mntpoint


Create the quota database files


Syntax:-

[root@localhost~]# quotacheck <options> <mount point>


Options:
-c create                           -g -- group
-u -- user                          -v -- verbose

Example:-

[root@test119 ~]# quotacheck -cugv /mntpoint/

Check if the quota database file aquota.group and aquota.user has been created

[root@test119 ~]# ls /mntpoint/
aquota.group  aquota.user  lost+found

Check the quota status

Syntax:- 

[root@localhost~]# quotaon <options> <partition>

Example:

[root@test119 ~]# quotaon -p /dev/sda9
group quota on /mntpoint (/dev/sda9) is off
user quota on /mntpoint (/dev/sda9) is off

Turn on Quotas:

[root@test119 ~]# quotaon /dev/sda9

To check the status

[root@test119 ~]# quotaon -p /dev/sda9
group quota on /mntpoint (/dev/sda9) is on
user quota on /mntpoint (/dev/sda9) is on

Apply Quota for the users:

Example:- User ravi can create 5 files or directories after which he gets  a warning message and he should not be allowed to create more than 7 files or directories

[root@test119 ~]# edquota -u ravi

Disk quotas for user ravi (uid 502):
  Filesystem                   blocks       soft       hard     inodes     soft     hard
  /dev/sda9                         0           0          0          0              5        7

:wq!

To check

Example:

[root@test119 ~]# su - ravi
[ravi@test119 ~]$ cd /mntpoint/
[ravi@test119 mntpoint]$ touch file1 file2 file3 file4 file5
[ravi@test119 mntpoint]$ touch file6
[ravi@test119 mntpoint]$ touch file7
[ravi@test119 mntpoint]$ touch file8
touch: cannot touch `file8': Disk quota exceeded

[ravi@test119 mntpoint]$ ls
aquota.group  aquota.user  file1  file2  file3  file4  file5  file6  file7  lost+found


Design by Free WordPress Themes | Bloggerized by Lasantha - Premium Blogger Themes | Affiliate Network Reviews